How to grow phytoplankton
Grow your own phytoplankton at home? It's possible! With our tips, nothing stands in the way of cultivation.
What is phytoplankton?
Phytoplankton is a collective term for unicellular algae (microalgae). These live in both marine (salt water) and limnic (fresh water) habitats. In the Baltic Sea alone, more than 800 different species of phytoplankton can be found. Like higher plants, microalgae have the ability to synthesise organic compounds from carbon dioxide (CO2) and water with the help of sunlight. Molecular oxygen is produced as a by-product. This biochemical reaction is called photosynthesis and is one of the most important biological processes on earth, as it provides all organisms directly or indirectly with food. In terms of process technology, microalgae are used to produce fuels and food supplements, among other things. The main focus in the article below is on marine phytoplankton.
What is phytoplankton used for in (marine) aquaristics and aquaculture?
Phytoplankton is primarily used as feed in (marine) aquaristics and aquaculture. It can either be taken up directly by organisms (e.g. by soft corals, sponges, tubeworms, etc.) or indirectly in the course of the food chain.
This is especially useful for breeding marine invertebrates and fish, as their larval stages often feed exclusively on zooplankton. However, before the zooplankton is fed to them, it can be enriched with the help of phytoplankton. Microalgae have a high content of unsaturated fatty acids, vitamins, amino acids, minerals and trace elements, which, after being ingested by the zooplankton, are available to the larvae and have a positive effect on larval development.
In addition, the dosage of phytoplankton has an impact on the bacterial composition and the microfauna and flora in aquariums as well as the water chemistry (nutrient concentrations, pH value, oxygen saturation, etc.)
Phytoplankton in shrimp farming: on the one hand as enrichment of the food organisms, on the other hand for the Greenwater method, which reduces cannibalism among the larvae and at the same time improves the water quality by absorbing excess nutrients
Which phytoplankton species are best suited for your own culture?
There are many different types of phytoplankton, which differ greatly in their characteristics and cultivation requirements. So before you cultivate a particular phytoplankton species, you should consider what goals you are pursuing with phytoplankton cultivation:
- Feeding filter feeders, corals and microorganisms in your aquarium.
- enrichment of zooplankton for rearing larvae
- Stabilisation of the tank biology and nutrient balance
- Increase competitive pressure on unwanted algae and bacteria
- other
If you want to raise fish larvae, for example, the cultivated plankton should have a high content of omega-3 fatty acids, as these play an important role in the larval development of fish, but unfortunately cannot be synthesised by the larvae themselves and must therefore be ingested with food.
For direct feeding of corals and filter feeders, on the other hand, the size of the algae cells as well as their cell wall properties are important, as this influences their absorption and digestibility. Since you usually do not keep only one type of coral in your aquarium, it can make sense to feed a mixture of different microalgae.
If, on the other hand, an unwanted alga or bacterium is to be displaced with the help of phytoplankton, the phytoplankton you grow should have very similar or the same requirements as the organism to be displaced.
In addition, the individual phytoplankton species have different sensitivities to contamination, density and temperature fluctuations, and nutrient availability. This means that the choice of the phytoplankton species to be cultivated also depends on how much effort you can or want to put into the cultivation. Phytoplankton concentrates, pastes or freeze-dried powders that are now available on the market may be a better choice for you.
You can find out about the cultivation requirements of the individual species (lighting intensity and duration, salinity, temperature, fertiliser, etc.) in advance on the Internet or in the relevant specialist literature, or you can simply ask the grower from whom you obtain your starter culture under which conditions he or she cultivates the microalgae in question. This has the great advantage that the alga does not have to get used to new culture conditions first.
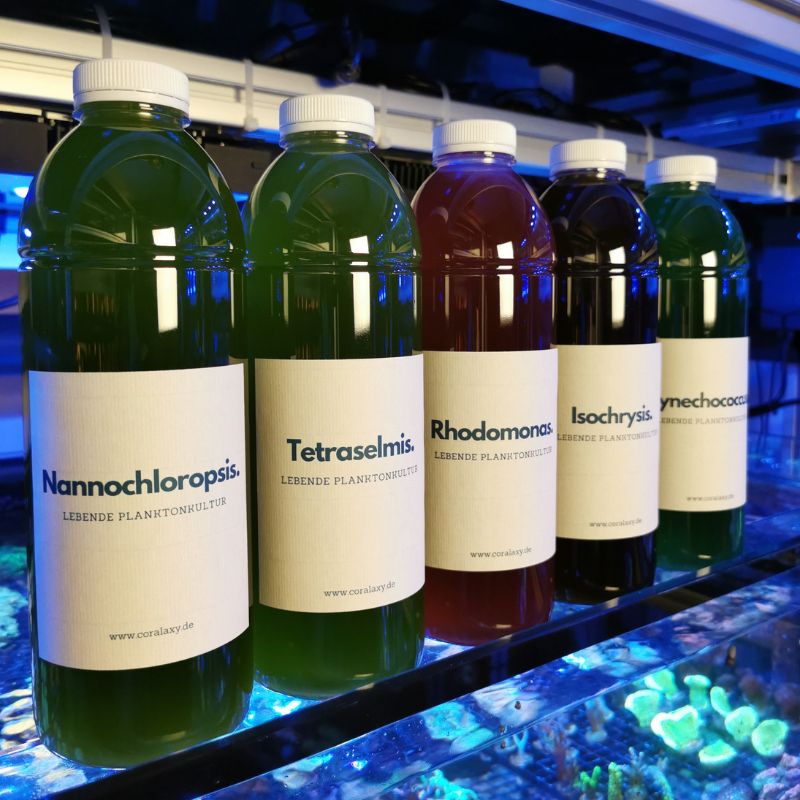
Each phytoplankton species has different properties (in terms of content/proportion of unsaturated fatty acids, cell size, etc.) and cultivation requirements. While Nannochloropsis is relatively easy to cultivate, Isochrysis, for example, is much more demanding.
What do you need for successful phytoplankton breeding?
For the cultivation of phytoplankton in your own four walls you usually only need a few things:
- Translucent culture vessel (aquariums, bottles, jars, buckets or professional plankton reactors)
- Light source (fluorescent tubes, LEDs)
- Diaphragm air pump (optionally with air filter) or magnetic stirrer (to keep the medium or algae moving)
- Phytoplankton fertiliser
- Starter culture
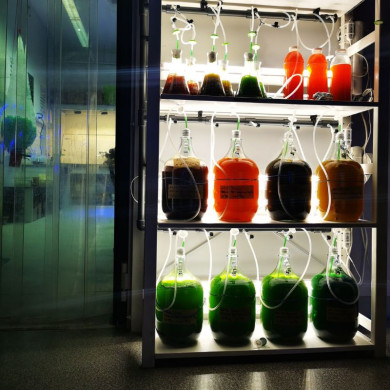
When choosing your culture container, you should make sure that it has a large enough volume for your needs. The material the container is made of should allow as much light as possible to pass through, be easy to clean and have a certain resistance to acids and alkalis. A large container opening facilitates cleaning. However, the containers should be able to be closed at the top by a lid or a cover to reduce the risk of contamination. For ourselves, transparent food-safe buckets with a tap (volume 5, 10, 20 and 30 litres) as well as 5-litre glass balloons have proven to be the most suitable. These containers are very easy to clean and have an unbeatable price-performance ratio. We use a highly concentrated citric acid solution (600 g/l) to clean the containers. In addition, we use silicone brushes and dirt erasers for the plastic containers (plastic is not scratched with these aids) and stainless steel balls for the glass balloons (eg for cleaning glass carafes). Of course you can also use a professional (and often fancier) phytoplankton reactor for your breeding.
Fluorescent tubes as well as different LED lamps are suitable as light sources. A higher blue and red component of the spectrum (cool white, daylight white) is advantageous for cultivating phytoplankton. There are (almost) no limits to your creativity here, and you can use almost anything from LED construction spotlights to strip lights and incandescent bulbs. However, the light source should have sufficient power or intensity, depending on the phytoplankton species to be cultivated and the culture vessel you have chosen. If you subsequently find that the intensity of your lighting is not sufficient or that the "maturation" of the culture is too slow, you can try to compensate for this deficit by extending the lighting phase. Especially with plastic containers, you should also make sure that the light source is at a sufficient distance from the container wall.
Diaphragm air pumps are the means of choice to supply the culture medium with sufficient oxygen and to keep the algae cells in suspension so that they do not settle at the bottom of the container. The higher the culture vessel you use, the more power or pressure the pump must be able to deliver. The total volume of the culture medium to be moved also plays a role and you may even want to aerate several culture vessels at the same time. In this case, it is highly advisable to use a sufficiently large air pump in combination with a suitable pressure distribution box, otherwise it will be quite difficult to aerate the individual culture vessels evenly. In addition, you should always pass the air in front of the culture vessel through a hydrophobic sterile air filter (e.g. PES filter with a pore size of 0.2 µm) to avoid contamination with bacteria.
Over the years, many different fertilisers have been developed for the cultivation of phytoplankton. In practice, the so-called Guillard or F/2 fertiliser (Guillard & Rhyter, 1962) has proven most effective. With some modifications, this fertiliser is suitable for the cultivation of numerous phytoplankton species. We ourselves use this fertiliser for all the plankton species we cultivate. When cultivating diatoms (diatoms), we also add silicate to the fertiliser or medium. You should find out in advance which fertiliser is suitable for which plankton or which modifications have to be made. Never use ordinary flower or plant fertiliser! The composition of this fertiliser is adapted to the needs of terrestrial plants, so that it is possible that not all of the fertiliser or the individual fertiliser components are/will not be used/absorbed evenly by the microalgae. This means that heavy metals and fertiliser residues can get into your aquarium when you feed the plankton. In the special phytoplankton fertilisers (e.g. F/2), the nutrients, trace elements and vitamins are present in a certain ratio so that the individual components are used up evenly (in a fixed ratio) by the microalgae. In practice, this is used to check whether the culture is "ripe" for harvesting. You should only feed or use phytoplankton when the fertiliser has been completely consumed. Usually you measure the nitrate value of your phytoplankton. If no more nitrate can be detected, the fertiliser has been completely used up and you can feed the plankton. For the nitrate measurement you can use nitrate test strips suitable for marine water or ordinary droplet tests.
Our tip: Cut the test strips in half lengthwise using scissors, so you can take twice as many measurements. With the droplet tests, you can halve the sample volume for this purpose. It is really only a matter of checking that no more nitrate is present.
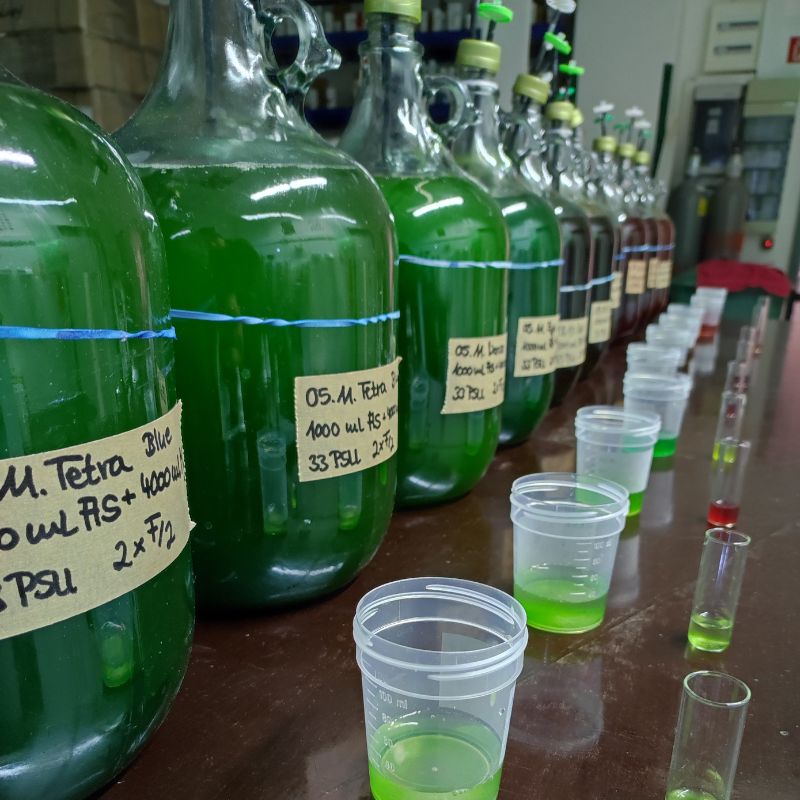
The "maturity test" - nitrate measurement is used to check whether a culture is ready for harvesting.
How do you prepare the culture medium?
The technical literature often refers to the so-called medium. This is actually only freshly prepared seawater and a certain amount of phytoplankton fertiliser.
To avoid the risk of contamination with bacteria or other protozoa from the outset, it is advisable to sterilise the salt water before use.
Sterilisation can be mechanical (filtration), physical (UV radiation, microwaves, heat) or chemical (ethylene oxide, sodium hypochlorite). Since very few of us have our own autoclave and boiling off larger quantities of medium is somewhat more time-consuming, we would like to show you here how we sterilise the salt water that we use for our medium cheaply and without much effort.
For this purpose, we use the chemical sodium hypochlorite. This is contained, for example, in cleaning agents containing chlorine, which you can easily buy in the supermarket. When buying, please make sure that it does not contain any tensides or other additives. The brand product DanKlorix©, for example, contains no additives other than sodium hypochlorite and can therefore be used without hesitation. Attention: When handling such chemicals or cleaners, we strongly recommend that you wear gloves and protective goggles! You should also make sure that the room in which you are working is well ventilated. And please remember to protect your clothes, because chlorine is a very effective bleaching agent and produces unsightly stains when it comes into contact with dyed textiles.
Depending on the load of the source water, you should use between 0.5 and 5 ml of chlorine cleaner per litre of salt water. We usually add 0.75 to 1 ml of chlorine cleaner to our medium, as the (germ) load of tap water in Germany is very low and it is best to use osmosis water for preparing the salt water anyway. We always add fertiliser to the salt water after sterilisation with sodium hypochlorite, so that vitamins, for example, are not damaged by oxidation. Theoretically, the sterilisation of the medium is completed after about 30 minutes. However, it is recommended to let the preparation stand for 12 hours or preferably overnight.
Before the phytoplankton fertiliser and the starter culture can be added, the chlorine must be completely neutralised. A sodium thiosulphate pentahydrate solution with a concentration of 60 g/l is used for this. The chemical sodium thiosulphate pentahydrate is used as a fixing salt in photography, for example, and can therefore be ordered relatively easily online. Now add one ml of the sodium thiosulphate pentahydrate solution per ml of the chlorine cleaner used before.
To be on the safe side, we ourselves dose 2 ml of the sodium thiosulphate pentahydrate solution per ml of choir cleaner, as the sulphate in these concentrations has no effect on the phytoplankton - but excess chlorine does. 4 hours after adding the sodium thiosulphate, all chlorine should have been converted to harmless hydrogen sulphate. This can be easily checked with chlorine test strips. If you don't have chlorine test strips at hand, your nose will do - it is very sensitive to chlorine.
Here is a short example: You want to sterilise a total of 5 litres of salt water. To do this, you add 5 ml of chlorine cleaner. After waiting >12 hours, add 10 ml of the sodium thiosulphate pentahydrate solution and wait another four hours. Now you can use the sterilised salt water for your phytoplankton preparation and add phytoplankton fertiliser and starter culture.
In our opinion, the sterilisation step is indispensable for the successful and long-term cultivation of very sensitive plankton species (e.g. Isochrysis sp. or Rhodomonas sp.)!
Our tip: To make your work easier, you can also buy more buckets, canisters or glass bottles than you actually need for the preparation of your culture. You can fill these with salt water of the right salinity and add chlorine cleaner - but not yet with sodium thiosulphate. This way you can store the salt water for a few weeks. Only when it is to be used for a fresh preparation is it dechlorinated. This saves you a lot of time in everyday life, as you do not have to constantly clean, fill, chlorinate and dechlorinate a single container (long waiting time), but can simply access your supply. You can collect the used culture vessels and clean and refill/chlorinate them together on your phytoplankton cleaning and care day.
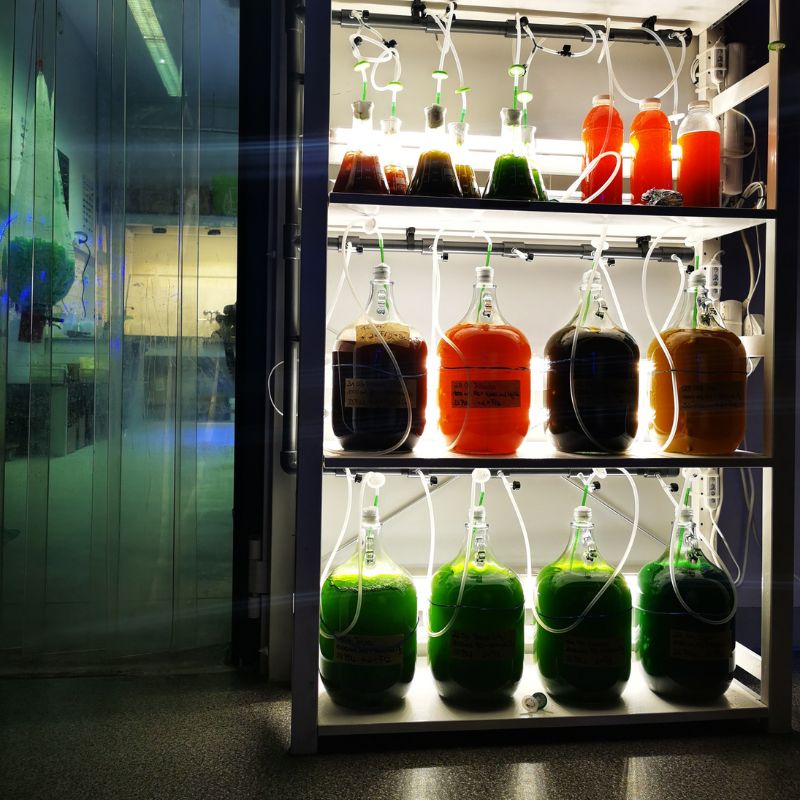
Part of the phytoplankton farming at Coralaxy: the self-built pressure distribution boxes ensure even aeration. Air filters and sealing plugs reduce the risk of contamination. The Erlenmeyer flasks contain part of the back-up cultures.
How high should the salinity of the salt water be for the production of the medium?
How high the salinity of the saltwater should be for the production of the medium depends primarily on the requirements of the plankton to be cultivated. However, you should make sure that you are always two to three PSU below the optimum specified in the literature, as water evaporates through the aeration of the culture and the salinity increases continuously during the cultivation process. It may even happen that so much water evaporates that you have to refill with fresh osmosis water. If you want to be on the safe side with regard to possible contamination, you can also sterilise the osmosis water with sodium hypochlorite beforehand.
How much fertiliser and starter culture do you need for a successful plankton culture?
As described above, the F/2 fertiliser according to Guillard is the most commonly used fertiliser for the cultivation of phytoplankton.
To prepare the finished culture medium with this fertiliser, you usually add 1 ml of the F/2 fertiliser to 1 litre of fresh (preferably previously sterilised) seawater. Please be sure to follow the instructions of the respective manufacturer (!), as it is possible that modifications have been made to the original recipe, which in turn lead to different dosage amounts. The recommended dosage of 1 ml per litre is also a guideline that works for the cultivation of most phytoplankton species, but may need to be reduced or increased (depending on the phytoplankton species to be cultivated).
How fast the fertiliser is consumed depends primarily on the setup of your culture (culture vessel used, lighting intensity / duration, strength of aeration, additional use of CO2, etc.) as well as on the amount and type of phytoplankton used for inoculation.
We recommend starting with a phytoplankton:medium ratio of 1:5. I.e. if you have a culture vessel with a volume of 5 litres, you need 1 litre of phytoplankton and 4 litres of medium. In general, the more phytoplankton you use for the preparation of your culture, the lower the risk of contamination with bacteria or another phytoplankton species.
With a 1:5 preparation, the time until the preparation matures is usually 7 to 14 days. If you are not satisfied with the density of your culture after this time, even though the entire fertiliser has already been used up, you can "top up" the culture again without any problems.
Batch, semi-continuous or continuous cultures - what is it?
In practice, there are three different cultivation methods with regard to the preparation and harvesting of the culture.
In the so-called batch culture (also discontinuous culture), the batch is completely harvested after the fertiliser has been completely used up, the culture vessel is completely cleaned and then a new batch is made with a new starter culture. Compared to the other two cultivation methods, the batch method is somewhat more time-consuming and less efficient. On the other hand, the risk of contamination during the cultivation process is significantly reduced. In addition, with a little experience it is easy to predict when the mature culture can be harvested (predictability). This cultivation method is particularly suitable for "home use" as well as for the cultivation of especially sensitive plankton species (Rhodomonas sp., Isochrysis sp.). We also use this cultivation method and the procedure described in the previous text primarily refers to it.
In semi-continuous culture, only a certain amount of plankton is harvested after ripening (usually between 25 and 50 %). The harvested plankton is then replaced by fresh medium. Since this is an ongoing culture and the phytoplankton:medium ratio is sometimes 1:1, the culture can be harvested again after only a short time. The process is repeated until the culture collapses. This saves both work and time. However, the risk of contamination increases. Semi-continuous cultures are well suited for phytoplankton species that are less sensitive (e.g. Tetraselmis sp.).
Continuous culture is the most demanding type of cultivation, as only as much fertiliser (or other resources) is added as can be immediately consumed by the microalgae. This means that theoretically the culture can be harvested at any time. A lot of (measuring) technology is needed for this method, and it is definitely too expensive and time-consuming for the ordinary hobby grower.
Hygiene and clean work in phytoplankton cultivation is the be-all and end-all!
Hygiene plays a very important role in the cultivation of phytoplankton. Therefore, we would like to give you a few practical tips for handling plankton cultures:
- If possible, use a hydrophobic sterile filter (e.g. PES with a pore size of 0.2 µm) for the aeration of your cultures. This greatly reduces the risk of bacteria entering through the air.
- Before working on or with the cultures, wash your hands thoroughly and then use a hand disinfection solution. You can get this at the drugstore or pharmacy.
- Disinfect all surfaces and equipment on/with which you work. A 70% isopropanol or ethanol solution is suitable for this. You can get these at the pharmacy, for example. Leave for at least 60 seconds. It is also advisable to prepare a permanent disinfectant bath with chlorine cleaner (500 ml cleaner to 5 litres of water) in an extra tub or bucket, in which tools, beakers, flasks etc. can be placed and disinfected.
- If you want to work with several plankton species at the same time, always start with the most sensitive species first. For example, if you want to start new cultures of Isochrysis sp., Tetraselmis sp. and Nannochloropsis sp., work exactly in this order, as Isochrysis sp. is the most sensitive and Nannochloropsis sp. the least sensitive alga in this list with regard to the risk of contamination. When changing to a different microalgae species, again disinfect all surfaces, tools and your hands thoroughly.
- All cultures should always be labelled with the most important information: Name of the plankton, date of preparation, amount of starter culture used, amount of fertiliser used, salinity, etc. This will help you when working with multiple cultures. This helps you to keep an overview when working with several cultures and preparations. If something should go wrong and a batch collapses, a proper labelling will help you to find the error afterwards.
- Ideally, you should get your own tools for each plankton species (e.g. measuring beakers, pipettes, etc.). Either buy them already in different colours, mark them with colours or label them accordingly.
- If you are cultivating zooplankton in addition to phytoplankton, it is advisable to place the cultures at a certain distance or even in different rooms to prevent contamination. Here, too, extra equipment is indispensable. If your phytoplankton and zooplankton cultures are placed on the same shelf for reasons of space, the phytoplankton should always be placed above the zooplankton. If some phytoplankton drips into the zooplankton cultures while you are working, it is less serious than the other way round.Buying a microscope is definitely a worthwhile investment for plankton cultivation. This is the only way to safely check your cultures for impurities and contaminations. A simple student microscope is sufficient for this purpose.
- Sooner or later you will contaminate your cultures with other microalgae, bacteria, protozoa or zooplankton, or your cultures will break down. In this case, you should create back-up cultures in advance, which can be "booted up" again if necessary. There are different ways to set up back-up cultures. In general, you should handle the back-up cultures as little as possible, i.e. it is best not to aerate them, only open them when necessary, etc. In addition, these cultures should be started with a "better" phytoplankton:medium ratio (1:1 or even higher). Under certain circumstances, it may even make sense to start the back-up cultures with a higher salinity. In this case, the microalgae may multiply only slowly, but the risk of contamination is significantly reduced. Smaller glass vessels are ideal for setting up back-up cultures. You can use Erlenmeyer flasks or a jam jar. We ourselves set up three different back-up cultures per phytoplankton species:
- Storage in the refrigerator, volume 500 ml, phytoplankton:medium ratio at least 1:1, no aeration (regular swirling), seal with cotton stopper, aluminium foil or a sponge.
- Storage on the windowsill (so that the cultures get some daylight), volume 500 ml, phytoplankton:medium ratio min. 1:1, no aeration (regular swirling), closure with cotton stopper, aluminium foil or a sponge
- Storage in phytoplankton rack, lighting via fluorescent tubes/LEDs, volume 500 ml, phytoplankton:medium ratio min. 1:1, aeration via sterile filter, closure with cotton stopper or sponge
By growing different back-up cultures, you significantly reduce the risk of contamination. The lowest risk of contamination is, of course, the refrigerator cultures. However, these may need some time to reactivate, as the microalgae first have to get used to the cultivation conditions again. Therefore, it is recommended to always check the aerated/illuminated back-up cultures for impurities/contaminations with the help of a microscope first, and if they are clean, to start a new batch with these cultures, as the microalgae are already accustomed to the cultivation conditions, and a new culture can be started up more quickly this way.
Back-up cultures should always be re-started on a set rotation. We start our aerated/illuminated back-up cultures every 7 days, the cultures that we have in the refrigerator or on the windowsill every 14 days.
Tip from us: If you only have a small amount of starter culture available for the preparation or if you have to start a new culture from a back-up culture, it is recommended to do this in several steps (in aquaculture this is called upscaling). I.e. you double the volume of the culture continuously (500 ml à 1000 ml à 2000 ml à 5000 ml). The phytoplankton:medium ratio of 1:1 considerably reduces the risk of contamination and prevents the culture from collapsing.